- Premiere Tips
15 Premiere Pro Tips, Hacks and Tricks for Beginners and Pros
Dec 17,2019• Proven solutions
Knowing how to edit a video in Premiere Pro is a boon, but having to enlightened about Premiere Pro tips can be an icing on the cake. What if we, today make you well-versed with the tips and tricks or say hacks that Premiere Pro takes? What if you can also make your editing experience better than before? Have you ever thought of it?
If you have, we are going to list some of the Premiere Pro tricks, tips and hacks irrespective of how much prowess you have over Premiere Pro. So, scroll down and become a pro on Premiere Pro when editing videos.
Premiere Pro Tips
1. Change playback resolution
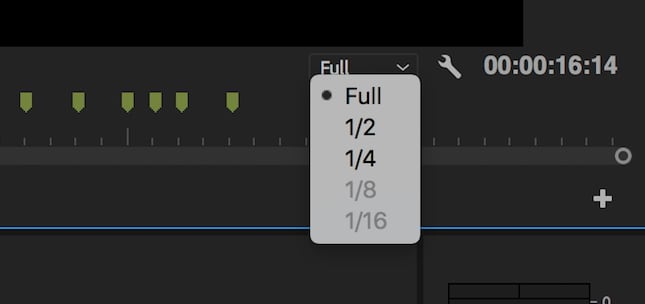
One of the Premiere Pro tips includes changing the playback resolution of your footage. Simply go to “Program Monitor” and hit on “Select Playback Resolution” box. You can choose from “1/2” or “1/4” for HD video and “1/8” or “1/6” for 4K and above video. In case the video is 1080p, you shouldn’t select less than “1/4”. Reducing the preview quality will lessen the system burden.
2. Remember to use proxy
Here is another Premiere Pro tip. According to this, if you want a smoother editing and rendering of your clip, using proxy is a considerable way. Creating proxies will improve the performance on your computer by reducing the footage quality for the time being. At the time of final rendering of the footage, the quality will be same.
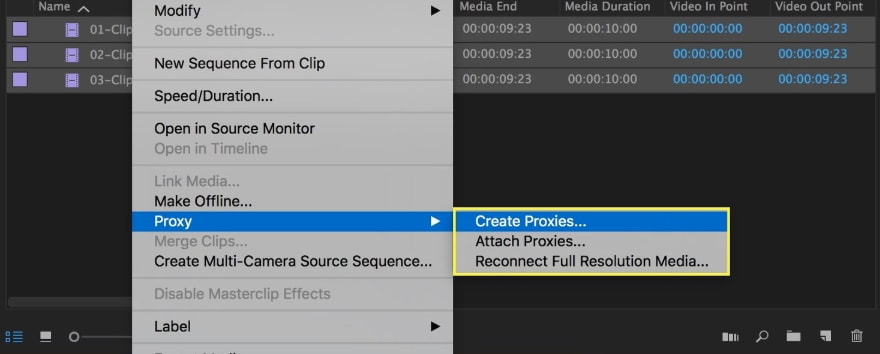
In order to use proxy, right-click on the video and pick “Proxy” > “Create Proxies” and choose file format and location of proxy. Choose “GoPro Cineform” or “Apple ProRes” followed by “OK”. Now, “Adobe Media Encoder” will be launched to render your files into easy-to-edit proxy files. Then you need to add a button in order to turn proxies on and off. Below the video preview, you may find “Program Monitor Toolbar” button.
Choose the “Button Editor” and drag the “Toggle Proxies” button on the toolbar. Quit the Button Editor then. From now on, you will see the proxy button getting turned blue when you press it. By re-pressing it, you can use the original media.
3. Use shortcuts
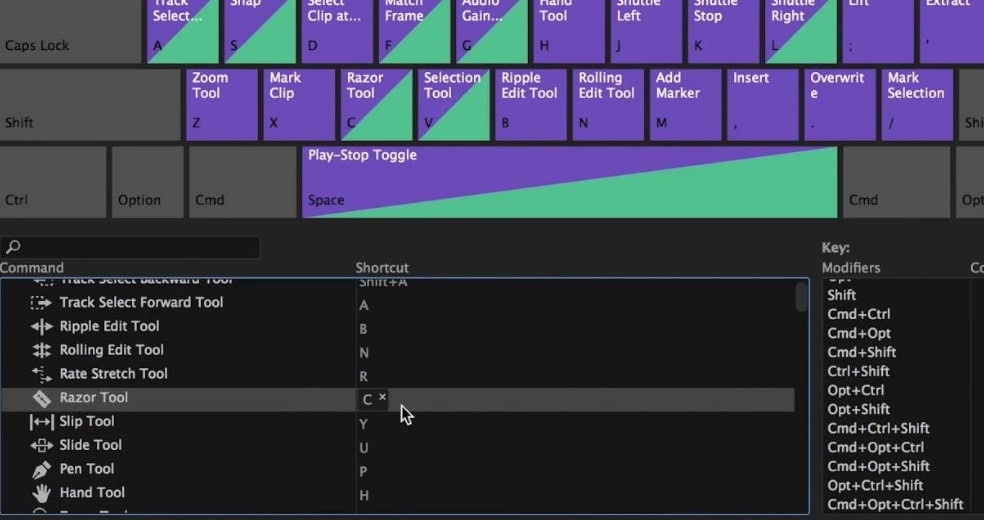
Who doesn’t love shortcuts? Not actually shortcuts, but everyone loves to get the work especially editing done speedily. When you know the shortcuts in Premiere Pro, you will be able to apply effects, making cuts and other things quickly. To follow this Premiere Pro tip, head to “Premiere Pro CC” followed by “Keyboard Shortcuts”. A keyboard will come up on the screen where you can notice all the shortcuts and learn them.
4. Enable Ripple Sequence Markers
As the next Premiere Pro tip, use sequence marker by pressing M and keep the track of what changes you have to do by giving the name, content and duration for markers. However, please ensure to enable Ripple sequence markers. This will shift the positions of the sequence markers when you move the clips on the time to match them.
5. Use Voiceover wisely
A video is incomplete without a voice-over. You are indeed going to use a voice-over in your video. And there are times when you aren’t having the perfectly recorded version of that voice-over yet. Well, during this wait you can utilize your time by recording a sample voice over directly over the Timeline. With the help a sample voice over you’ll have a rough idea to get through with the clip editing (trim crop etc.) meanwhile.
It is easy to add voiceover to video. For this, head to the “Settings” menu over the “Timeline” and then add a Voice-over Record button by customizing the audio track headers. Now, you simply need to hit the Voice-over Record button and you’re good to go.
Note: Set up an input sound device before hitting the record button.
Premiere Pro hacks
6. Synchronize Audio
Syncing audio with the video can be challenging when you have to use an external recorder and move the audio file frame-by-frame. However, with this Premiere Pro hack, you can synchronize your audio track in a click. Wondering how? Choose the audio clips to be synced and right-click. Choose “Synchronize”. Select “Audio” at the bottom and the program will do the job.
7. Lag
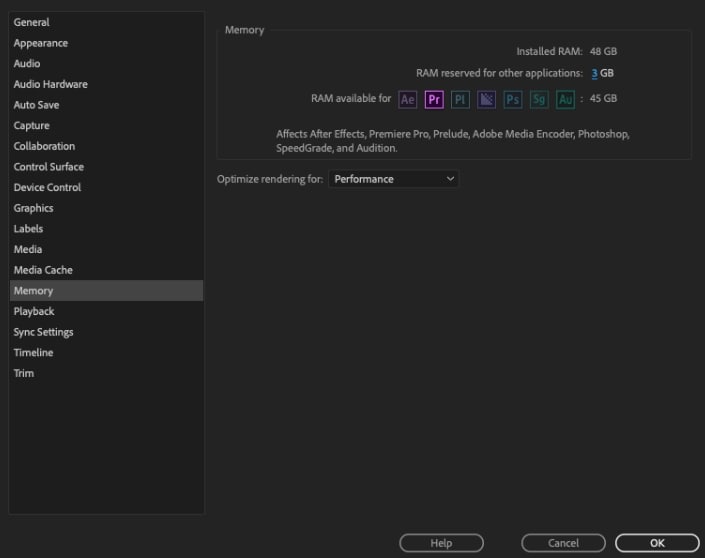
No one likes lagging in there footage. On your system, when you add plug-ins, it may eat up internal memory thereby letting you experience lag. However, there is a Premiere Pro hack that could come to rescue. Simply head to “Edit”, “Preferences”, “Memory” and keep the “RAM reserved for other applications” lowest. This will lessen the amount of lag. You can use the tips to fix lagging issue.
8. Use Adjustment Layers
Giving a cinematic feel to the footage is never a bad idea. Using this Premiere Pro hack rather than just “Lumetri Color” for color grading, you can boost your video’s quality. You can opt for some cheap or free packs from the LUT packs. And to add a professional look, you can go for more advanced pack named as Magic Bullet Looks. Now, you can place the adjustment layer and lower the opacity as needed.
9. Dynamic Trimming
There are times when you have to do minor trimmings in your clips. And it takes full concentration for a precise trimming. For this, use this Premiere Pro hack and make your cuts perfect. With dynamic trimming, you can work in frame-by-frame to cut the video.
10. Use reverb to end audio track
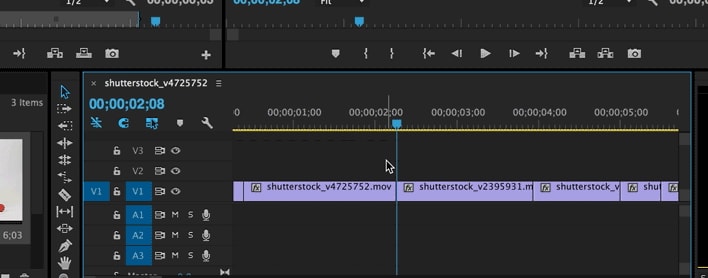
Use the reverb effect to make your footage more dramatic. Choose the clip that needs to get this effect. Nest it (by right clicking) and add black video in a new sequence. You can now add the reverb effect.
Premiere Pro tricks
11. Set In and Out Points
With Premiere Pro you can easily set In and Out points of a video and that too, without performing the tedious conventional steps (import, trim start and end point to have your final in and out of clip). Moreover, you can even set IN and OUT marks while previewing your shots in Source Monitor.
With this technique, Premiere Pro saves you a heck load of time. You simply need to mark the Start and End of your clip and you’re done. On top of that, the clip doesn’t even get deleted! Instead, only the clip between the start and end points are set to visible.
To get this done, you need to head to Project Browser and double tap on any clip. This will bring up the Source Monitor. Hit “Spacebar” to start previewing the clip, hit the “I” key to set the IN mark wherever desired and the “O” key when you reach the OUT mark.
Alternatively, you can tap on Mark In and Mark Out button to serve the purpose.
Once done with marking, a “mini timeline” gets visible right under the selected clip to depict the marked section in regard to the entire shot.
12. Use Ripple Edit
The next Premiere Pro trick suggests you to use Ripple Edit Tool. This tool can be helpful in trimming the clip and filling the gap automatically. Usually, when we trim the video, we have to cut, delete and then shuffle the clip to fill the gap. To save you from such time-consuming process, Ripple Edit tool (shortcut B) will help you dragging the clip for expanding or reducing. The program will then bring the other clips itself and fill in the gap.

13. Edit While Exporting
If you wish to edit the video while you export, you can’t do so. For this, you need to follow this Premiere Pro trick. Simply queue up the exports in the Adobe Media Encoder. In Quora, many users also talked about this tip. With this, you will be able to do editing in Premiere Pro while the Media Encoder will look after the exporting part.
14. Delete Empty Tracks
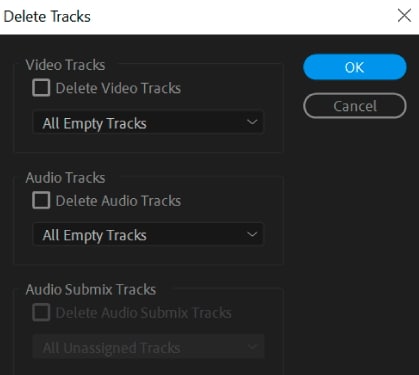
Another Premiere Pro trick that can help you is deleting the empty tracks. There are times when you work with multiple tracks and some of them aren’t in use. In order to remove those, simply right click on the track header and hit on “Delete Tracks”. Upon the dialogue box gets opened, go for deleting the individual tracks or the empty ones.
15. Learn to use Alt Key
You can make use of Alt keys for shortcuts and this way you can do the edits rapidly. Alt keys can help you in isolating selections of audio and video clips, duplicate the clip, dragging the clip or rearranging it. According to this Premiere Pro trick, if you learn the use of Alt keys for different functions, a lot of time can be saved while editing the clips.
Bring up your video to a professional level with straightforward tools.
Try It Free Try It Free

Liza Brown
chief Editor
0 Comment(s)