How To Make an Amazing Video For Your Graduation Party
Apr 28,2020• Proven solutions
If you plan to go to a graduation party, you should find a way that you can capture all of the memories that you are building at that party. Unfortunately, many people tend to lose touch after school, no matter where you are moving on to. If you are having a graduation party, an excellent way that you can have a keepsake of the potential last time that you and all of your classmates were in the same room together, is with video.
By setting up several cameras across a graduation party or taking a video of your graduation party, you can edit together an excellent graduation video that you can hold onto and keep as a treasure, just like your yearbook. Here's an example:
How to make an amazing video for graduation party
When it comes to getting a great graduation video there are some top considerations to keep in mind:
1. Plan out the shots
Most graduation videos are usually between 5 to 10 minutes long so that they can be re-watched and enjoyed regularly. If you are planning on including photo images as a slideshow, you'll want to keep around 100 images per video with 4-5 seconds per image.
You could also add in video clips, but it's important to follow roughly the same type of rule with shots. You could go around asking each of your classmates in a small class what their educational experience meant to them and ask for one to three-word answers. Planning is the key, and having an idea of what the video will look like in the end rather than just editing files together is essential. It can be a very daunting task to consider editing countless files without a clear vision in mind.
2. Pick the right music
Sometimes it can be tough to get good quality sound out of a point and shoot camera or cell phone. An excellent way to add extra emotion to your video as well as cut out some of the poor quality sound is with picking the right music.
Adding music over top of the images or video in a video editing program is a great way to add extra feeling to your video and make it look great. Pick a good song as the music that you pick will forever be synonymous with their graduating class!
3. Take a great format for sharing
You have to decide how you will eventually share the video as well, so it's vital to pick a format that's great for sending out. Saving videos in MP4, AVI, MOV, AVCHD, or some other formats and uploading it to YouTube or another file-sharing website could be an excellent way to make sure that anyone who wants to access your video can do so and at any time. Make sure that the video editing software you are using is capable of output into a file type that is good for sharing online.
Check the the best video formats for YouTube/Facebook.
4. Using the right video editing program
When it comes to the eventual editing process for your graduation video, it is a good idea to use the right program. Making a video for your graduation party is never easy. Still, with the right editing program, it can certainly speed up the amount of time that it takes to edit the video as well as the quality of the product that you will eventually produce.
Wondershare Filmora9 video editor is a program capable of producing AVI, MOV, MP4, MKV, AVCHD, and more file types. If you’re wondering which video maker or slideshow maker you should use, you can download the trial version of Filmora9 to test.
Benefits of Using Filmora9 to Create a Graduation Video
- Free Slideshow Transition templates for showing different scenes with emotion;
- Sync video to audio beat easier with Auto Beat Detection;
- Plentiful free titles & effects templates;
- 100+ interesting elements, including emojis.
In the following part, I'll show you how to make a graduation video with this easy to use slideshow maker and video editor.
Whether you want to make graduation slideshow or a graduation video with music, you can always follow the core steps below to complete it.
How To Make an Amazing Video for Your Graduation with Filmora9 [Step by Step]
If you haven't installed Filmora9 yet, click the button below to download and install it on your Windows or Mac PC.
Step 1: Import Your Graduation Photos/Video
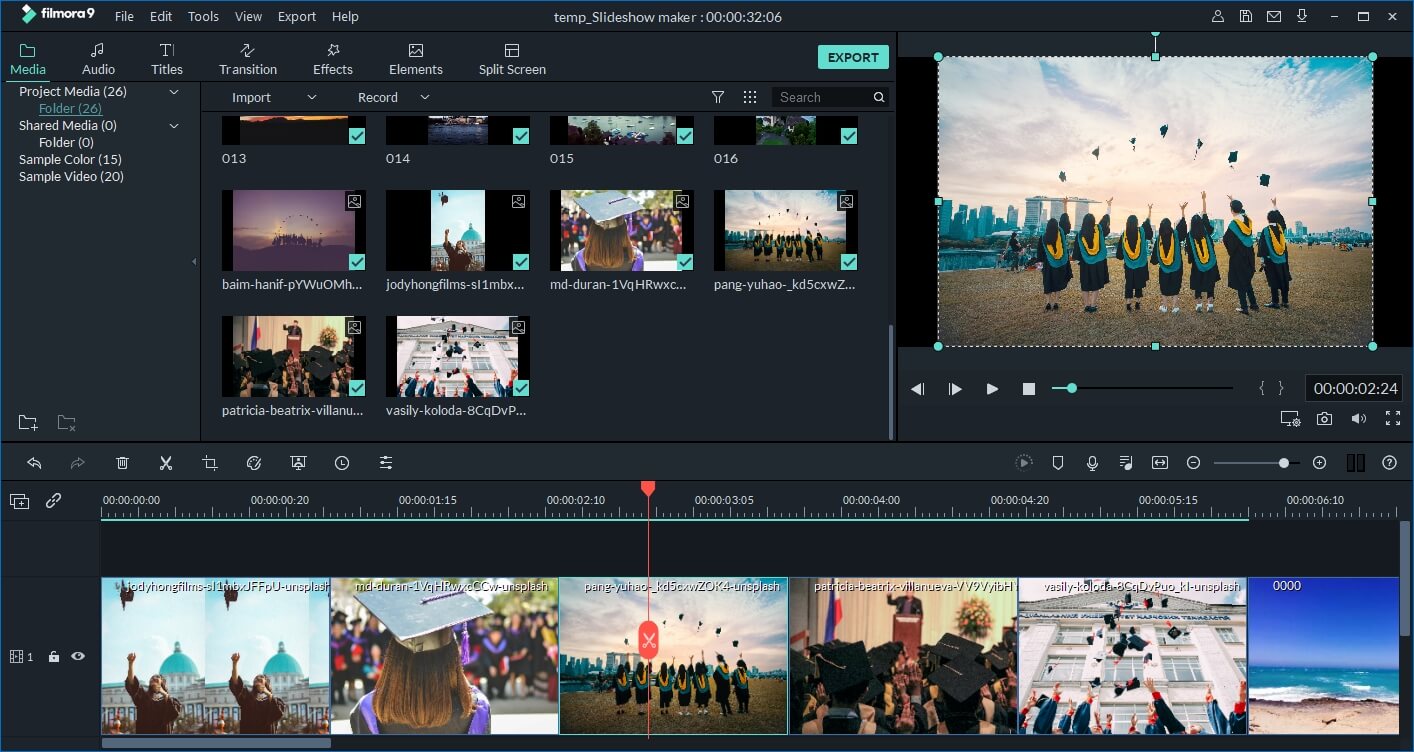
Launch Filmora9 video editor and then click New Project to start the graduation video project.
Click Import, and then select to import media files or import a media folder based on your needs.
The imported media files will be displayed under the Media tab, and you can click it to preview on the right window.
Note: the project aspect ratio will be 16:9 widescreen by default. So, when some of your photos or videos are shot at 9:16 (vertically), you'll see a black bar when playing it in the Preview window. No worries, there are several ways to remove the black bar; one creative way is blurring the video background.
Step 2: Drag to Timeline to Edit
Now, it’s time to edit the graduation video. Drag and drop the video footage or the graduation photo to the timeline directly and then zoom in the timeline for better visualization.

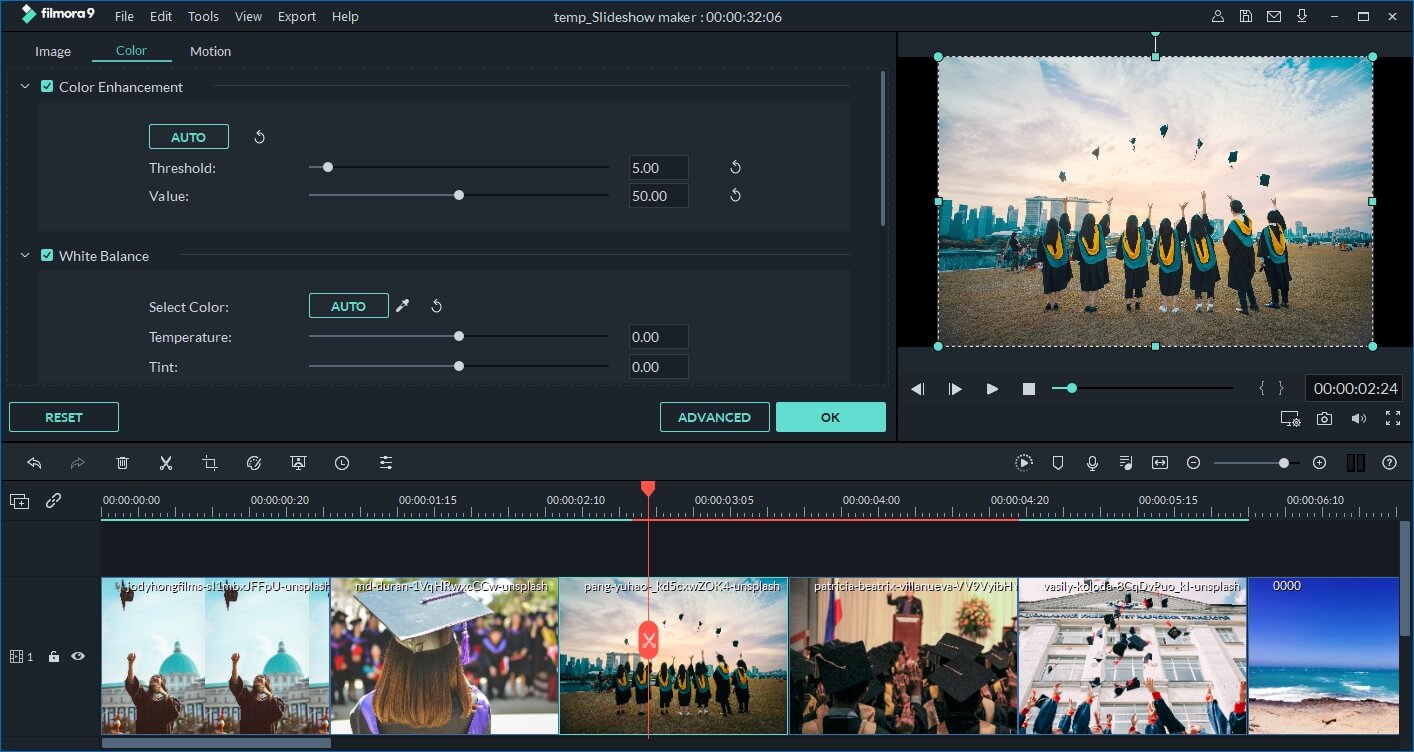
If you’re creating a graduation slideshow with photos only, you can adjust the order of each photo and arrange them as you like, and then adjust its duration. To adjust the color of the graduation photo, double click it and then switch to the Color tab. For the detailed information about color correction in Filmora9, you can check this guide about how to correct color in video.

If there are some video footage on your media source, you can trim out unwanted parts, or adjust the video speed to make a backward or forward effect.
Step 3: Add Music and Sound for Graduation Video
Now, let’s add the background music to the graduation video. You can add some hot songs for graduation video to the video since I’m using Filmora9, I can pick the royalty-free upbeat music from the built-in Audio library. I often add the Living Pulse series music tracks to my video, and you can find it through the search bar.
Filmora9 features the beat detection tool, which can detect the beat in the music and mark it automatically. I used it and then adjusted the photo duration to the beat, and it looks good.
Step 4: Add Titles & Voiceover for Better Annotation
Besides adding background music to video, you can also add titles, lower 3rds and subtitles to express your feeling.
If you want to record your voiceover during the video, just record the Microphone icon on the screen to start.
Step 5: Add Transitions/Elements/Overlays
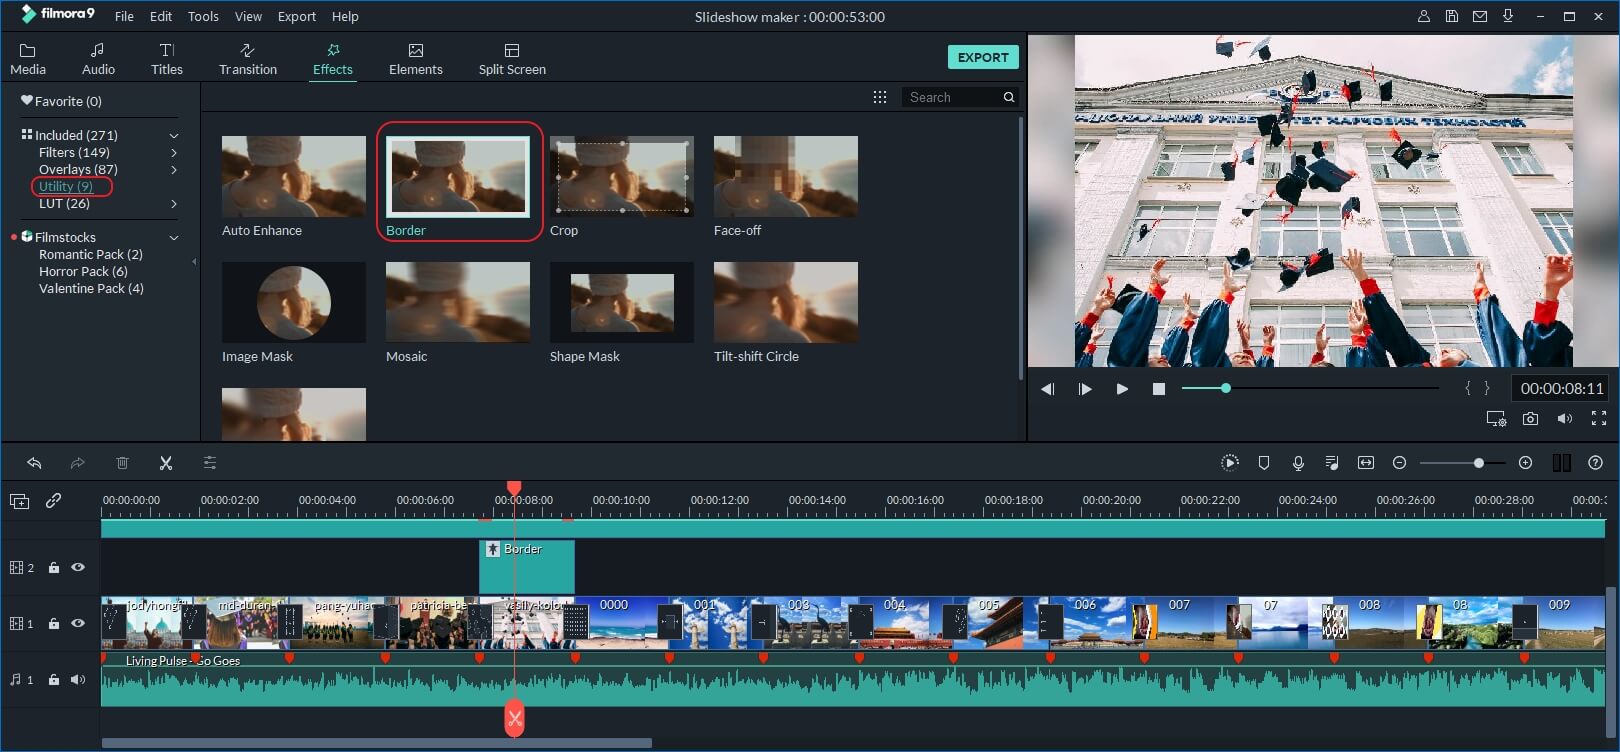
You can use transitions and overlays to make the graduation video playing with a more dynamic effect. In case you want to add a frame to your graduation photo in Filmora9, here is how you can do it. Go to Utility under Effects tab, and then drag and drop Border to the picture that you want to add a frame. Drag the Border duration to cover the photo in the timeline, and then double click it to adjust the size, color, blur range of the border.

Step 6: Save and Share
After editing is finished, click the Export button to save and share your graduation video. Perhaps the best part about this program is that it also makes the process of sharing very easy. Saving the video can be done in multiple file formats, and you can share it on mobile devices, upload it to a video-sharing website, uploaded to YouTube & Vimeo or burn it to DVD for watching.
Below is a graduation trip video made with Filmora9 I found on the Internet. Hope it will help you to make a better graduation slideshow video this time.
If you are having a graduation party you should strongly consider planning out a beautiful graduation video that you can edit for everyone to keep afterwards!
Bring up your video to a professional level with straightforward tools.
Try It Free Try It Free


Liza Brown
chief Editor
0 Comment(s)