


- Premiere Tutotial
How to Add Timecode in Premiere Pro

Aug 29,2019• Proven solutions
Adobe Premier Pro CC being one of the top video editing software crafted for TV, film, and the web is winning hearts every passing day. As it’s essential for adding timecode on Premier Pro in order to include countdown in a video, you need to know more about this tool.
Most camcorders and top-notch video decks record timecode marking certain frames captured or identified in the past. In order to add timecode on Premier, you need to keep in mind that why exactly you need it in the first place. When you want to log clips even before they are captured, automated batch captures, recapturing clips as the actual file got corrupted, while trying to export sequences to another system through EDL, and while syncing audio and video recorded separately into one file etc.
So, in case you are unsure of how to add timecode on Premier Pro, then we have the right solution for you in this article. Keep reading to explore more.
How to add timecode in FilmoraPro easily
If you want to have an easier way to add timecode in a video, we highly recommend using FilmoraPro. It is easy to add timecode by dragging and dropping from effects panel. After adding timecode, you can also adjust the its format. You will have accurate and fluid timecode in FilmoraPro. Download it now!


Part 1: Step by Step Tutorial to Add Timecode with Premiere
Here we are going to explain the detailed process of adding timecode using Premier Pro. As we have discussed above, what kind of tasks Premier Pro can serve with timecode addition to your videos. Let’s see the step by step process guide you through.
We would take an example, where you got a three-minute video on the Premier Pro timeline, but you want the timecode be set to 00:57:00:00, to let the show initiate at 01:00:00:00.
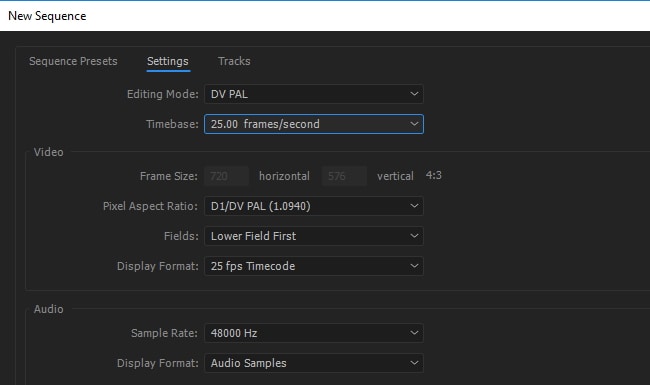
Step 1: Verifying the FPS
The default start time for sequence is 00:00:00:00 which depends on the frame rate you have set for the counts to begin. Go to File > New Sequence > Settings > Timebase drop-down.
In this section, set the correct frame rate under Timebase section. The sequence settings should match as that of the footage you have uploaded on the timeline.
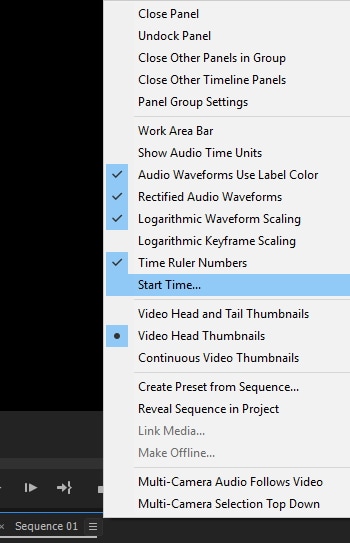
Step 2: Choose Start Time
In order to mark the starting timecode on your sequence, you need to tap on Timeline Panel Menu. You can find it by hitting the three parallel lines adjacent to Sequence name and then click Start Time…
Step 3: Specify Start Time
You need to manually key in the starting point of the timecode along with the offset to adjust the clock and leaders. Under the Start Time you need to mention the hours, minutes, seconds, frames in a left to right sequence. You need to enter ‘00’ hours, ‘57’ minutes, ‘00’ seconds, and ‘00’ frames. Now the sequence will take action from this time.
Part 2: How to Choose Timecode Display Format
Now that you have learnt how to add timecode on Premiere, how about going a step further and see how to select the timecode display format. Though, by default Premier Pro shows the original timecode from the source medium for any clip. For a frame within a tape having timecode 00:00:10:00 you can see the timecode is post its capture, i.e. 00:00:10:00. It’s easy to log clips using source timecode and source timecode is visible irrespective of the sequence’s timebase that used it. in case the a clip and sequence have different timebase, source timecode makes logging footage an easy task.
Adobe Premier Pro also enables you to see the frame count while you choose ‘Frames’ or ‘Feet And Frames’ in a panel. Frame count of every clip can be set to start at 0 or 1, alternatively you can convert it from the source timecode as well. When a frame within a 30-fps clip is having a source timecode 00:00:10:00, you get the option to convert timecode through ‘Timecode Conversion’ with a frame number 300. Adobe Premier Pro can convert 10 seconds at the 30-fps frame rate to show 300 frames here.
Here is a step by step guide –
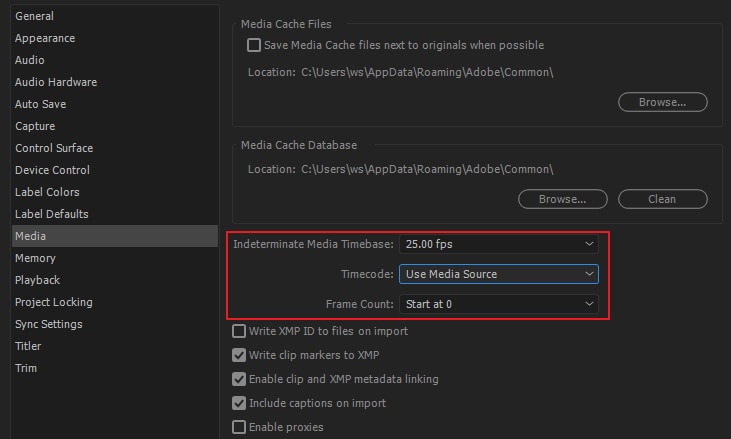
- In the Adobe Premier Pro interface, go to Edit and select Preferences. Tap on Media(Windows) or Premier Pro followed by Preferences and then Media(Mac).
- Browse the Timecode menu and select Use Media Source (it shows the timecode which has been recorded on the source) or ‘Start at 00:00:00:00’ (it starts timecode visible for each clip at 00:00:00:00).
- Now, tap on the Frame Count menu and pick ‘Start At 0’ for numbering each frame in a sequence, where the first frame number is 0/ ‘Start At 1’ for numbering frames in a sequence starting from 1/ ‘Timecode conversion’ for generating frame number equivalent to the source timecode numbers.
- At the end, click on OK.
In a nutshell
From the above article, we conclude that while adding timecode on Premier Pro, the process is not as tough as you might have assumed earlier. This article has cleared how to add timecode on Premier and how to select the timecode display format as well. Now, you must be confident to guide a friend for using timecode on Premier Pro easily without much effort.
Bring up your video to a professional level with straightforward tools.
Try It Free Try It Free
Liza Brown
chief Editor
0 Comment(s)