How to Add Motion Blur to Videos in AE? [4 Ways]
Feb 04,2020• Proven solutions
Even though the very notion of blurry images is commonly frowned upon among professional cinematographers, adding motion blur to a video or an animation can help you highlight the movement of a figure or an object in a shot and make it look more natural. The term motion blur refers to the streak-like effect in still and moving images produced by the rapid movement of depicted objects. Even though it is possible to create this effect with a video camera, the common practice is to add the motion blur during the post-production. In this manner, you can avoid having to deal with footage that’s out of focus or too blurry to use in a video. The visual effects, motion graphics and compositing applications like AE offer several ways to add motion blur to a video, and in this article, we are going to show you how to add motion blur in Adobe After Effects.
Adding Motion Blur to Videos with After Effects Alternative FilmoraPro

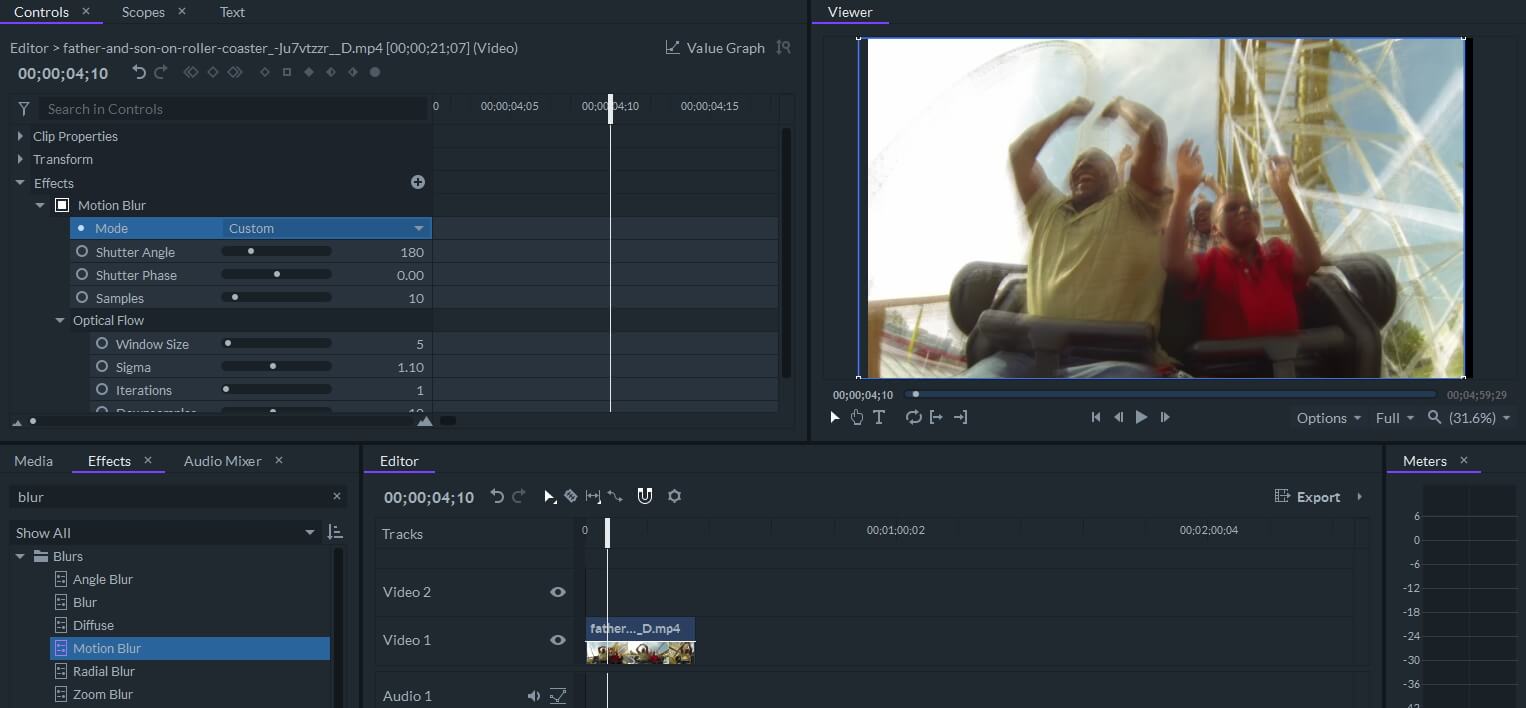
The newly released professional video editing software from Wondershare Filmora allows you to add and adjust the motion blur effect easily. Just drag the Motion Blur effect to the video in the timeline and then go to Controls to adjust settings. You can use the motion blur preset to make a quick blur or customize the motion blur settings, such as increase the shutter angle to make a nice looking motion blur, adjust shutter phrase and samples, and adjust the window size, sigma, iterations as well. Download the free trial version below and add motion blur effects to video in FilmoraPro today.
You may also like: How to Make Motion Blur Effect in Premiere Pro CC
How to Add Motion Blur to Videos in AE? [4 Ways]
The trick to maximizing the visual impact of the motion blur is to know when to use it because just applying the effect on any clip won’t produce the desired result. What’s more, things get even more complicated if you’re working on an animated video because you’ll have to find a way to fit the effect in the aesthetic of the video. Regardless of the type of project, you’re currently working on, you can use Adobe’s AE to create this effect. Let’s explore different methods of adding motion blur to videos in this software.
Method 1: Applying Timewarp Effect to Add Motion Blur
This time effect lets you do much more than add a simple motion blur to your footage, because it enables you to control the playback speed of a clip, and create slow motion or fast-motion videos. Timewarp lets you adjust a number of settings such as interpolation methods, source cropping or motion blur. The effect is based on Kronos, a component of the Furnace software, and you can use it to add motion blur to a clip without altering its playback speed.

The Shutter Angle option allows you to choose the intensity of the motion blur produced by the Timewarp effect and it is measured in degrees in order to simulate the exposure created by the rotating shutter. The Shutter Sample setting should be used to adjust the quality of the motion blur you’re adding to a video. However, if you attempt to create a matte after you’ve applied motion blur with Timewarp, the effect will remain unaffected by the matte.
Method 2: Using Pixel Motion Blur to Create the Motion Blur Effect
If you’d like to have more control over the Shutter options, the Pixel Motion Blur effect that can be found under Time category in the Effects menu is a much better choice than the Timewarp effect. The footage may look unnatural after you increase its playback speed, but adding motion blur can help you fix that.
![]()
The Pixel Motion Blur examines the footage to which you apply it and it synthesizes the motion blur with the help of motion vectors. As a result, this effect can make computer generated motion look more realistic. The Pixel Motion Blur lets you set the Shutter Angle and Shutter Samples options manually while selecting the Automatic Shutter Control option will adjust Shutter Angle and Shutter Samples values to the selected layer or composition. The Vector Detail allows you to decide how many motion vectors the software is going to use to calculate the blur.
Method 3: Using the CC Force Motion Blur on Animated Footage
Like the previous two effects, the CC Force Motion Blur can be found in the Time category of the Effects menu. The effect is frequently combined with other effects like CC Page Turn or CC Star Burst to make them look more natural. However, the CC Force Motion effect needs to be applied either to the nested composition or to an adjustment layer in order to be used with other effects.

The effect lets you control the Motion Blur Levels and you must switch on the Override Native Shutter option so that the effect can have an impact on the animation. The Shutter Angle feature should be adjusted in accordance with the demands of the project you’re working on. However, using the CC Force Motion Blur can slow down the rendering of the animation’s preview, which is the reason why a lot of professionals opt for other methods of adding motion blur to the animations they create in AE.
Method 4: Install Third-Party Motion Blur Plugins in AE
Using a plugin to add motion blur to the footage you’re processing in AE, is probably the easiest way to make the movement of the objects in a shot smoother. ReelSmart Motion Blur is one of the most popular motion blur plugins for AE, DaVinci Resolve and other powerful video editing and animation software. What this plugin does is that it tracks every pixel automatically and then it applies motion blur to it. It also offers the possibility to add blur using motion vectors delivered by AE or any other system the plugin is compatible with. ReelSmart Motion Blur can be extremely useful if you’re working on a large project and you simply don’t have the time to adjust the motion blur settings every time you apply the effect to the footage. However, this plugin can’t be downloaded for free and you must pay $149.95 for the pro version or $89.95 for the regular version of the plugin.
Tips: Though After Effects has some built-in motion blur effects in the default comp panel, you need to enable it first to add motion blur to the moving subject in video.
Conclusion
It is important to note that motion blur can be enabled directly from the AE’s toolbar, and used on every asset you add to the timeline. However, using the effects from the Time category like Timewarp or CC Force Motion Blur might help you gain more control over the quality and the amount of motion blur you’re applying to your footage. Using a plugin for AE like ReelSmart Motion Blur is probably the easiest and the fastest way to add high-quality motion blur to your videos and animations if you can afford to spend some money on a plugin for AE. Which method of adding motion blur to videos in AE do you like to use the most? Leave a comment below and let us know.
Bring up your video to a professional level with straightforward tools.
Try It Free Try It Free


Liza Brown
chief Editor
0 Comment(s)